|
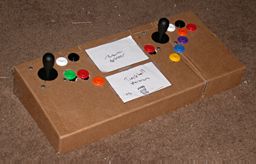
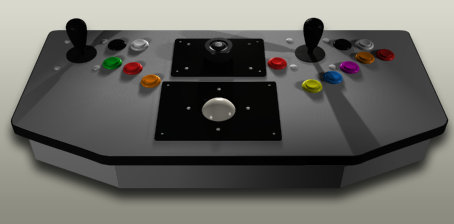
Above is a conceptual rendering of what it may look like. Originally, it was designed to be 12 1/2" deep x 24" wide x 3 1/2" tall. These dimensions will most likely change, depending on how they work out in real life. The spinner is, of course, a Cheep Spinner. The trackball will be a Cheep Hackball, assuming I can get it to work. Whether or not I ever build and sell these depends on how much time, effort and money it takes to build the first one. Either way, I'll post a PDF file with complete how-to instructions on this site, for anyone wanting to build their own.
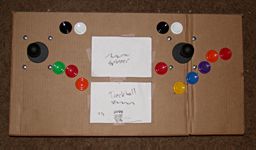
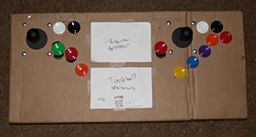
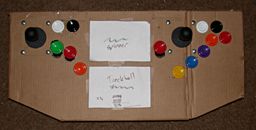
Here's a rundown of the controls (the colors are only for clarity during the design process, they may not be the same in the final version): The white buttons are 1 or 2 player start. The black ones are for coin inputs. The red buttons are (generally) primary fire buttons. The left one is for Tempest, Arkanoid, Centipede, Scramble, etc,. the middle one is for Battlezone (using the right thumb), the right one is everything else. The orange buttons are secondary buttons. Left side: bomb, superzapper, etc. Right side: thrust, bomb, etc. The green is reverse for Defender and Stargate. It's also used for rotate left in Asteroids (and all such games), with the red button next to it being rotate right. Those two, with the orange one next to them can be used for Missle Command. The purple button is smart bomb, sheilds, hyperspace and a host of other third-button functions. Alternately, the blue button can be used for that, if it's more comfortable. Primarily though, the blue button is there for hyperspace in Defender, Inviso in Stargate and whatever fourth button may be needed elsewhere. The yellow button is there for hyperspace in Stargate, or whatever else may be needed. The right joystick is for all single joystick games (because I'm right-handed). If people decide to use the plans to build their own, they can assign controls however they like. The left joystick is for dual-stick games like Crazy Climber, Battlezone, Robotron, and also for Defender and Stargate. Current problems with the design - the buttons for Defender's reverse and Battlezone's firing are as close as they can possibly be to the sticks, but I don't think they're close enough. I won't know until I put together a real prototype and actually play it. It also won't play anything with an analog stick, a yoke, or a joystick with trigger. I'm debating swapping the right hand joystick for one with a trigger, but I haven't decided to do that yet. I don't want to pile a third joystick on there if I can avoid it. If I can make the Cheep Stick work, then that might go there. Q*Bert is a problem too, but I'm hoping that might be solved in software.
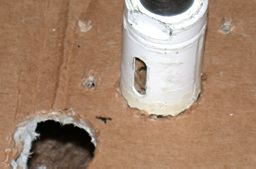
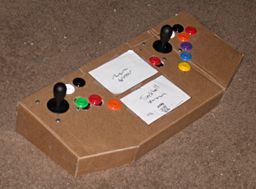
Update 11/14/01 - I have to use a larger case for the Hackball. This will leave me less space on the Control Freak, but it doesn't look like it's going to be too bad, since it's only 1/2" extra on each side of the Hackball, and there's a little bit of room there available on the mockup. It's more of an aesthetic issue than anything, I really hoped I could use the same size case. Depth may be a problem, but I'll be cutting the new Hackball case down some to try and keep it as low-profile as possible. I re-re-rendered the concept illustration to match all of the new dimensions based on the cardboard mockup and for the new Hackball case. The dimensions of the base will be 11" x 24" now, although the top of the control panel will be slightly larger, since I want to round the corners off. I'm going to have to buy a table saw (just a small portable bench-top model) since cutting the compound angles on this thing would be impossible any other way. Oh well, I can pick up a nice Ryobi for about $100. (Didn't this site originally have something to do with inexpensive arcade controls or something like that?) That's what I get for wanting an angled front and slanted top.
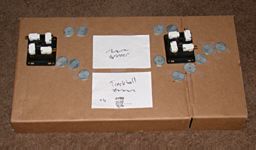
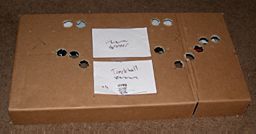
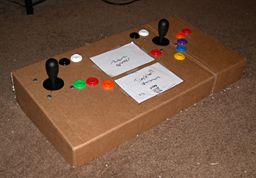
Update 11/7/01 - I put together the cardboard mockup this weekend.
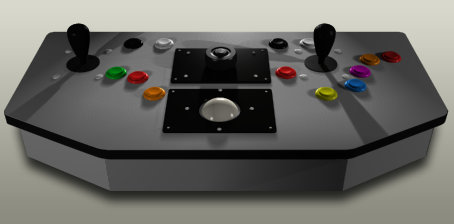
Update 11/3/01 - I've been working in a 3D program to try and nail down the basic layout a little better before I start building. The new rendering reflects those changes.
I moved the "insert coin" buttons up by the one and two-player start buttons. It's just easier to deal with, plus it's more familiar to have them there, since I'm used to using the keyboard. Some of the other buttons moved slightly, but final postitions won't be decided until I start working on a full-sized mockup. Also, I've changed the Spinner and Hackball to reflect what their dimensions, positions and appearance will be. I haven't yet figured out where I'm going to put the switch on them. If it goes on top - it will have to be a recessed switch so it doesn't get bumped during gameplay. That would be the ideal solution. If the switch goes on the side, then I have to cut an extra notch in the panel to allow for it. As it is, the USB cables come out of the units near the top, so I either have to make a notch for that, or move the cable to the bottom of them. I'm more than a little concerned about the Hackball actually fitting inside the case that I want it to. I won't know for sure until the new Happ parts arrive for it. It's really important that it fits, since that's sort of the whole concept behind this thing. I'd like to just have to deal with one case size. If it doesn't fit the case, I may have to use a Happ mounting plate for the Hackball, which means it won't be a removable free-standing trackball anymore. Finally, I changed the joysticks over to the bat-handle type. Personally, I'd rather have traditional red-ball topped joysticks, but the ones Happ is selling of that style are only 4-way sticks designed for metal control panels (that was an expensive mistake). I can get Wico red-ball sticks locally, but I don't know how good the supply is since Wico is questionable right now. I'm hoping since Happ aquired Midaway's parts division (which includes Williams and Atari) that more options may become available. I'm working on a full-sized cardboard mockup, since it's much easier to change things around (button positions, etc.) before I start working with wood.
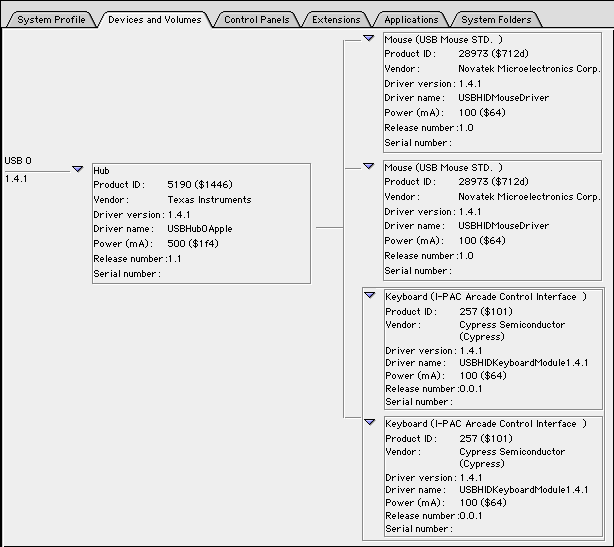
Update 11/1/01 - Work begins! I've got the guts hooked up and I have a rather large pile of buttons and joysticks on the workbench. So I should have a basic prototype working by the end of this weekend. I'll post pictures when I have something to show. I'm changing one key design element of the Control Freak. Instead of permanently mounting the Spinner and Hackball in the control panel, I'm going to slide them in as removable free-standing units. There are several reasons. First, they don't need to be permanently mounted to be secure - they'll be supported on the sides and bottom, so they aren't going anywhere during game play. Second, it adds more flexibility to the design, since I can remove them and take them somewhere else if I want to. Third, it won't take up any more space than mounting them permanently would. I'm also going to put on/off switches on the Spinner and Hackball instead of a USB A/B switch on the panel. The reason for this is, an A/B switch is similar to unplugging a device and plugging another one in. This would be fine most of the time, but if you do this within MacMAME, it won't recognize the change. You'd have to quit and restart MacMAME. The on/off switches will be wired to the optical circuits on the gutted mice instead, and simply cut off the signal at a point where the mouse will think it's stationary. So the Mac will always see both devices, but you can have one, both or neither active at any time. I'm using a Tripp-Lite bus-powered 4-port USB hub. This costs about $20, and was one of the cheapest bus-powered hubs I could find with at least 3 ports. Plus, I really like Tripp-Lite's surge suppressors, so I think they make good products. Hooked into the hub, is a Hackball prototype, Cheep Spinner and an I-Pac (a USB arcade control interface board). Everything shows up in Apple System Profiler, just as it should. The Spinner and Hackball both work, but I don't have anything hooked up to the I-Pac yet. (Click on the picture below for details.)
There's an I-Pac utility for Macs written by Chritian Viola, which allows you to program the I-Pac to suit your own needs. It also has some test functions in it, so you can check for stuck buttons and so on. If you have an I-Pac, grab it! If you don't have an I-Pac, buy one, then grab it.
So with the guts all working, the next step is to cut up some wood, drill some holes, and slap together a quick 'n' dirty prototype. At this point the final Hackball design isn't ready yet, so that won't actually go inside this prototype, but the Hackball prototype will be hooked up to it externally.
Update 6/26/01 - An update? Does that mean I'm actually working on this? Well, no. Since then it would be on the Works In Progress page. But once the Hackball is working... that should change. I have made one alteration to it - there will be a USB switch to flip between using the Hackball and the Spinner. This will cut down the cost of adding a USB hub, and realistically, nobody's going to be using them both at the same time anyway.
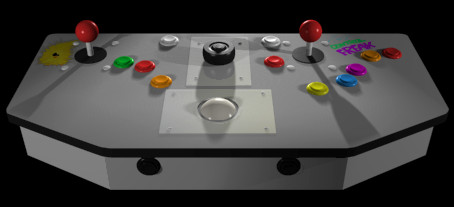
Original concept rendering:
|
 The Cheep
Control Freak is a work-in-progress.
The Cheep
Control Freak is a work-in-progress.